Adding Subtitles to a DVD
If you want to add another subtitle language to your DVD, here is a guide to help you do it, using only freeware tools. Also in case you are not happy with the original subtitle positions or colors, you can use the same process to reposition them, or remap their colors.
What do you need (see www.doom9.org or www.dvdrhelp.com):
· DVDshrink (release 3.2), to compress the DVD, and create a backup on your hard disk.
· Subtitle Workshop (optional), to convert subtitles to SubRip *.srt format.
· SubtitleCreator (needs to have the .NET framework installed) to convert *.srt or *.sub files to *.sup subtitles streams
· PgcDemux, to de-multiplex a DVD to separate movie (*.m2v), audio (*.ac3) and subtitle (*.sup) streams
· IfoEdit, to multiplex video, audio, and subtitles back together again to a DVD. Alternatively, use ReJig instead of IfoEdit – a bit slower and needs more intermediate hard disk space, but you won’t have to copy the subtitle colors in step 5.
· VobBlanker can optionally be used if you wish to keep the menus.
· DVD burning software
· At least 9Gb available on your hard disk.


The
main steps are described here
1. Copy the original DVD to your hard disk using DVDShrink (see Figure 1).
a) Open disc (top left)
b) Enter re-author mode (top right): Drag everything that you want to keep, excluding the menus, from the right DVD browser window to the left window. Here, only the main movie is preserved. But, alternatively, you can also copy the extras to your re-authored DVD, and they will be included as additional chapters at the end of your movie.
Although DVD Shrink is very good in keeping the menus (use full disc backup in that case, and compress the extras manually), after adding the subtitles they won’t work anymore unless you go through some very elaborate steps as explained in optional step 7 below. The reason for this is that the corresponding IFO file, generated at the end of the process described here, doesn’t know anything about the menu structure. There are two other solutions that I didn’t try myself, that you might want to look into if you are really keen on preserving everything. The first is by searching for IfoUpdate, the other is by doing everything manually, as described here:
http://forum.doom9.org/showthread.php?s=&threadid=70765&highlight=dave82.
c) Select the compression tab, and deselect any audio and subtitles that you don’t need – deselect the audio because they cost a lot of space, deselect the subtitles so you don’t have to include them anymore later on.
d) Press backup DVD (top menu) and select where you want the output to go. Although DVD shrink includes an interface with Nero, allowing it to directly write your stuff to a DVD, you should deselect this option in the preferences, as we still need to add our new subtitle. Additionally, if you have to compress a lot (say to less than 80%), it is good to set the deep analysis mode (tab ‘Backup options’, ‘smooth’ interpolation), as it will lead to a better video quality.
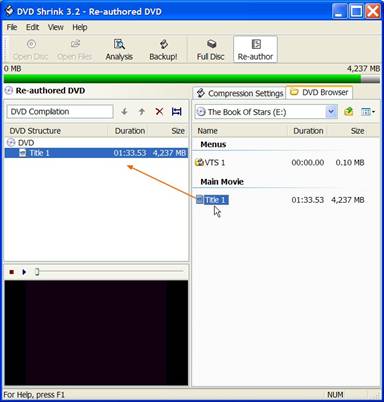
Figure 1. DVD Shrink is used to extract the DVD to the HD.
2. Optionally, convert subtitles to SubRip (*.srt) format using Subtitle Workshop (see Figure 2)
While DVDshrink is creating a backup of my DVD, I download a subtitle and if it is not in SubRip or MicroDVD format (i.e. it doesn’t have the *.srt extension or *.sub format, convert it using subtitle workshop to SubRip format).
Further note that I first had some trouble to see special characters correctly
(2b+d): I had to use the Central European font in this tool, but I also needed
to change my general computer settings (Control panel/Regional
settings/Advanced/Non-unicode language/ to Romanian).

Figure 2. Subtitle workshop allows you to convert many different formats to SubRip format.
3. Convert *.srt or *.sub subtitles to binary subtitle *.sup stream using SubtitleCreator (see Figure 3).
· Press CTRL-X for express mode. It will allow you to load your subtitle file, the IFO file of the current DVD with the color palette (normally VTS_01_0.IFO), and an existing SUP file for synchronization purposes.
· Press CTRL-S to start generating your *.SUP file
Optionally, you can:
- Preview the DVD, and (optionally) synchronize the SUP
- Change the subtitle colors which are used.
- Change the subtitle position (note the two triangular markers, which indicate the top and bottom of the subtitle window, and can be used during DVD playback to position your subtitle).
- Change the subtitle appearance (alignment, bold/italics/underline, or large font)

Figure 3. SubtitleCreator converts your subtitles to a *.sup stream, which can be multiplexed with the DVD's video and audio streams.
Note that the following two steps can also be done using Nik’s freeware tool, ReJig, which has almost identical interfaces, and has better support for NTSC movies: instead of step 4, select ReJig’s file mode, instead of step 5, select ReJig’s DVD Author mode. However, it is slower and produces large temporary files, so I normally prefer IfoEdit and VobEdit.
4. Demultiplex original DVD using PgcDemux (see Figure 4)
By this time, DVDshrink will probably be ready, and you have a set of IFO (InFOrmation), BUP (BackUP copies of IFO), and VOB (Video OBject) files on your hard disk. The largest IFO contains the movie.
1. Start PgcDemux, and open the (largest) IFO movie file.
2. Select the output folder.
3. Select ‘Demux video stream’
4. Deselect ‘Create logfile’
5. Press ‘Process’
Note: Older documentation contains an example using VobEdit. However, this program is no longer supported, it seems, and it sometimes gave errors in IfoEdit (too many framedrops), which I didn’t get anymore after I switched to this program. Another advantage is that it automatically creates the CellTimes.txt, which contains the start frames of each chapter.
Tip: Before I run PgcDemux, I execute a
small script (setdvd.bat, stored in my Windows directory, so I
can always run it), which contains the following three lines, and which I run
from the DVDshrink output directory:
md AUDIO_TS
md VIDEO_TS
copy VTS_01_0.IFO AUDIO_TS
In the AUDIO_TS folder, the de-multiplexed (step 4: *.m2v, *.ac3, and *.sup) files go (see selection in Figure 4, step 2).
In the VIDEO_TS folder, we will
put the newly multiplexed movie.
This has the advantage that it has the same structure as a DVD, which is needed
by some software players, like WinDVD, when playing
from a file.

Figure 4. PgcDemux is used to de-multiplex the DVD files, i.e. to split them in separate video (*.m2v), audio (*.ac3) and subtitles (*.sup) files.
5. Author new DVD using IfoEdit or ReJig DVD author mode (see Figure 5)
Start IfoEdit and select menu item DVD Author/Author new DVD (this has to be the first thing that you do in IfoEdit, else this item is not available).
- Select the files created by PgcDemux: first the m2v video files.
- Select the ac3 audio files.
- Select all original sup subtitles, including the one you created in step 3.
- Set the corresponding languages of all subtitles (select the sup file, then set it)
- Load the CellTimes.txt (created by PgcDemux in step 4) for the start time of the chapters. If you use ReJig, you can also load the original IFO file, containing the color palette.
- Select the output folder for the new DVD – this one containing your new subtitle!
Note: If you don’t have much free space on your HD, you can now delete the original VOB files used in step 4 (don’t delete the IFO file with the same name).
The final step it to copy the subtitle colors from the original IFO to the new IFO (see Figure 6): as this often creates problems, I have indicated the steps separately. In case you use ReJig, you don’t have to do this anymore, as you already selected the IFO in step 5 above.
- After IfoEdit is ready, you will see two IFO files, both in the VIDEO_TS folder. The VIDEO_TS.IFO file, and the VTS_01_0.IFO.
- Load the original IFO file (select ‘Open’)
- Select AUDIO_TS\VTS_PGCITI\VTS_PGC_1
- Go to the ‘Subtitle Color’ menu and copy the color info. Now, open the new IFO and select VIDEO_TS\VTS_PGCITI\VTS_PGC_1, go to the ‘Subtitle Color’ menu again and paste the color info.
- Save the (IFO and BUP) file.

Figure
5. IfoEdit allows you to create new DVDs using its authoring tool: several video, audio, and subtitle streams
can be multiplexed together to create new DVD VOB files.

Figure 6. IfoEdit also allows you to copy the original subtitle colors from the original DVD IFO (Information) file, i.e. the file that was originally ripped by DVD Shrink, to your own IFO file.
6. Test the output and write to an empty DVD
Using a DVD player (e.g. VideoLAN) that can play from the hard disk, you can quickly inspect whether the DVD was authored correctly. If you are satisfied with the new subtitles, burn the files to a DVD (in the VIDEO_TS folder) and enjoy!
7. Optionally, add the menus
using VobBlanker
(Figure
7)
Finally, if you have decided
to keep the menus in step 1, you need to
do one last step, which VobBlanker (thanks to a tip
from ConNS) makes very easy.
- Select the original DVD files
- Select the place where you want to store the results
- Select the largest VOB files (3532Mb), which contain your movie
- Go to the bottom window, right click on the title, select replace, and browse to the newly created files (output of step 5)
- Process everything and you are finally done!

Figure 7. VobBlanker allows you to merge the newly created VOB with the original files, restoring the menus.